(→Rooms) |
|||
| Line 45: | Line 45: | ||
[[File:Skull_solution.png|thumb|left|Solution to the Skull Puzzle, by Fummy.]] |
[[File:Skull_solution.png|thumb|left|Solution to the Skull Puzzle, by Fummy.]] |
||
| + | |||
| + | |||
| + | |||
| + | |||
Revision as of 16:36, 19 July 2014
The 5th Floor is the fifth location in the House.
Puzzles
Doll Puzzle (Part 1)
The door to the Witch's Garden is locked. In front of you are four coloured pedestals and only three coloured dolls.
- Simply place the dolls on a pedestal of the same colour.
- The purple doll will not yet take part of this puzzle.
Flower Puzzle
The yellow flowers will only give their pollen to Viola if she is willing to X the white flower. However, if Viola improperly X the flower, Viola will die instead.
1. Go to the Yellow Flowers Room, which is to the left of the garden. Talking to the yellow flower toward the bottom of the table will give you the option to X the white flower.
2. After entering the Cellar to the right of the garden, talk to the red grasses, which are located in the bottom right corner. They will present you with three possible options involving the proper way to X a flower.
3. Talk to the white flower in the garden and choose the proper way to X a flower.
Hint: "The Talkative Plants" reveal that while the red grasses are knowledgeable, they are always lying.Therefore, the inverse of their statements are true. (For example: "None of the three ways to X are proper" becomes "One of the three ways to X is proper.")
Note: The proper way to X a flower is to pluck it.
4. After you X the flower, talk to the yellow flowers to receive White Powder.
Skull Puzzle
The four skulls located on the fifth floor are required to let water return to the Water Chamber toward the top of the Cellar.
1. Looking under the nightstand, which is on the left side of the three beds in the Yellow Flowers room, will reveal the first skull.
2. In order to receive the second skull, you must read "The Talkative Plants" and then listen of one of the red grasses. The skull will be sitting on the chair near the desk with "The Talkative Plants."
3. Complete the second step in the White Powder Puzzle.
4. Inspect the fallen cage next to the right cell and open the cage door. This will give you access to the Poison Hallway toward the top of the garden.
5. Inspect the dressers, the barrel, and the bookshelves in the hallway entrance until you find a skull. (Note: There is a time limit of fifteen seconds in the hallway before Viola will die of poisoning.)
6. Enter the top-right room to enter the Skull Hallway. Reach inside the old pot to find the final skull.
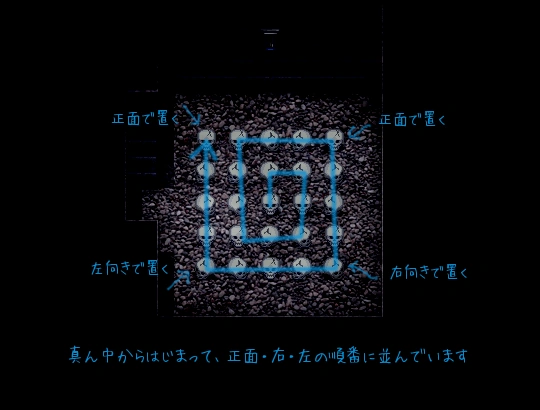
7. Enter the Skull Room at the end of the hall. Arrange the skulls in the correct order by placing them in the crevices on the floor.
Hint: Read "The Skull Soldier" in the entrance of the Poison Hallway. Take notice as to how the soldier patrols the castle ruins. This correlates to the skull arrangement in the Skull Room. (Front, left, right, front, left, right...)
Hint 2: Look for the skull facing frontward in the center then search those around it for their arrangement. The skulls should follow a clockwise spiral pattern starting from the center.
Solution to the Skull Puzzle, by Fummy.
Note: The skulls should be in the positions as follows:
- Top-Left Corner: Front
- Top-Right Corner: Front
- Bottom-Left Corner: Left
- Bottom-Right Corner: Right
8. Pull the lever near the top of the room. This will fill the Water Chamber with water.
9. Upon entering the hallway, a Giant Skull will chase you back into the Skull Room. Loop around the skull arrangement and exit into the hallway. The Giant Skull will stop pursuing you once you enter the Cellar.
White Powder Puzzle
Viola is unable to enter the Left Cell in the Cellar unless she is able to satisfy the desires of the prisoner in the Right Cell.
1. Complete the Flower Puzzle.
2. Go in front of the Right Cell and use the White Powder. When the prisoner responds, choose to give the powder.
3. Retrieve the Flower Petals in front of the tree in the garden.
4. In the entrance of the Poison Hallway, check the shelves to the right in order to find an Empty Bottle.
5. Use the Flower Petals and place them into the Empty Bottle to get a Bottle with Petals.
6. Complete the Skull Puzzle.
7. Enter the Water Chamber and stand by the water. Use the Bottle with Petals and fill it with water. The light emitting from the petals will allow you to enter dark areas.
8. Enter the Dark Maze, which is to the bottom of the Yellow Flowers Room. Walk to the left at the first intersection, walk downward at the second intersection, and walk to the left left at the third intersection.
9. At the end of the path, retrieve the Jade Pipe from the furthest drawer.
10. When the Male Bust Statue starts following you, walk downward at the first intersection, walk to the right at the second intersection, and walk to the right at the third intersection.
11. When you drop the bottle, walk upward until you enter the Yellow Flowers Room.
12. Go to the Right Cell in the Cellar and toss in the Jade Pipe to the prisoner.
Red Shoes Puzzle
The Poison Hallway suggests that it is impossible to cross the hallway unless Viola has colorless shoes in her possession.
1. Complete the White Powder Puzzle.
2. Open the door to the Left Cell and inspect the cloth at the top of the cell. You will receive Red Shoes.
3. In the Water Chamber, stand by the water and wash the blood off the Red Shoes. In its place, you will receive Glass Shoes.
4. When the chair wriggles upon exiting the Water Chamber, do not move any further downward. Instead, run to the right of the desk. When the Giant Skull purses you once more, dash down and enter the Left Cell. The Giant Skull will leave once you exit the Cellar.
Poison Hallway Puzzle
Viola must discover a method of crossing the Poison Hallway without being killed.
1. Complete the Red Shoes puzzle.
2. Do not be distracted while crossing the Poison Hallway, for it will waste the time you have left in the room. This is especially true for the Poison Room, which is located on the right side in the middle of the hallway. Enter the Diary Room (2) on the other side of the hallway.
Number Puzzle
Viola cannot enter the door on the other side of the Number Lock Chamber without discovering the password to the door. Therefore, she must find the numbers that correspond with the top-left corner, the top-right corner, the bottom-left corner, and the bottom-right corner in that respective order. (Note: As of Version 1.07, VGPerson has removed this puzzle from the game.)
1. Write down the equations involved with the puzzle. The equations are located on the four corners of the room.
- Top-Left = Bottom-Right plus Top-Right
- Top-Right = Bottom-Left times 666
- Bottom-Left = Bottom-Right minus Top-Left
- Bottom-Right = 6
2. You can use the system of equations to solve this puzzle, but there is a much quicker way to do it using common sense alone.
Hint 1: There are four numbers, but only a four-digit code. Which means that the numbers are all single digits from 0 to 9.
Hint 2: The key to the puzzle is the top-right. If it only becomes one digit after being multiplied by 666, what digit would it have to be...?
Note: The password is 6006.
Doll Puzzle (Part 2)
In order to gain access to the Witch's Room, she must find the doll that can rest on the purple pedestal.
1. Complete the Number Puzzle (if necessary).
2. Search the left side of the top-left cabinet near the center of the Medicine Room to obtain the Cute Little Bottle.
3. Walking away from the cabinet will cause a doll head to crash through the window. It is suggested to obtain the Doll Head from the bottom half of the room.
4. Upon picking up the Doll Head, multiple Red Eyes will begin to chase you. You must escape from the Medicine Room and the Number Lock Chamber to be fully exempt from their wrath.
5. Enter the Poison Room and walk toward the right side of the room to obtain the Headless Doll.
6. Use either the Headless Doll or the Doll Head and choose to combine it with the other half of the doll.
7. Head back to the Doll Room and place the Doll on the purple pedestal. The red pedestal will move, revealing the entryway to the Witch's Room.
Rooms
4F-5F Stairway
Dark Hallway
Doll Room
Witch's Garden
Yellow Flowers Room
Diary Chamber (1)
Dark Maze
Poison Hallway
Poison Room
Diary Chamber (2)
Number Lock Chamber
Medicine Room
Cellar
Left (Mother's) Cell

Right (Father's) Cell

Water Chamber
Skull Hallway
Skull Room
Characters
- Black Creature
- Ellen (afterimage only)
- Elder Tree
- Ellen's Father
- Ellen's Mother
- Tadpoles
- Invisible Bird
- Red Grasses
- White Flowers
- Yellow Flowers
- Male Bust Statue
- Giant Skull (x2)
- Red Eyes
Items
- White Powder
- Empty Bottle
- Flower Petals
- Skull (x4)
- Bottle with Petals
- Wristwatch
- Jade Pipe
- Red Shoes
- Glass Shoes
- Cute Little Bottle
- Doll Head
- Headless Doll
- Doll
Events
Dark Hallway:
- The 5th Floor is probably most remembered for this event. As Viola walks along the Dark Hallway, a loud crash will be heard as a dark figure will come out of the window and hurryingly crawl towards her. Before it harms you, Ellen’s figure will appear in front of the player to shield them. Both mysterious figures will eventually disappear, allowing Viola to proceed.
- In Version 1.07, the event’s animation is slightly more detailed as Ellen’s sprite can be seen reaching her hand out at the Dark Figure to magically make it vanish.
- When the player returns to the hallway, the second window on the left will shatter.
Witch's Garden
- If the player talks to the Elder Tree, they will initially be told to be silent; and then be warned not to disturb the keepers of time.
- After killing the white flower, the Black Cat will tell you that what you did was mean, while the Elder Tree will simply remind you to be silent.
- When the player returns to the Witch’s Garden after receiving the White Powder from the Yellow flowers, Ellen figure will briefly be seen sitting on the bench next to the Black Cat.
- After retrieving the doll head, all grassy flooring in the 5th floor will de dyed red.
- The Elder Tree will be dyed red.
- The Black Cat’s tea cup will finally be empty.
- After placing the Purple Doll on its matching pedestal and interact with the Black Cat, the cat will tell you that he doesn’t care whether you make it out alive or end up getting eaten by house (as either scenario will benefit him). But as an afterthought, he then will tell the player (presumably with mild concern) not to die on him.
Cellar
- After solving the Skull Puzzle, the pot will break as you approach the center of the Skull Hall.
- When the player interacts with the Tadpoles, they will reveal themselves to be the Frog’s kin.
- Speaking to the Tadpoles three times will cause the tile below you to break, making you fall into the water and drown.
- When the player walks towards the cellar’s exit after pulling the lever, the chair next to them will jitter.
- Entering the cellar after exploring the Dark Maze will cause the book “The Talkative Plants” to close shut.
- After tossing the Jade Pipe in the Father’s cell, the bloody message that told you where to find the pipe will change to “And after I hid it so well…”
- When you leave the Mother’s Cell after retrieving the Red Shoes, a figure of a headless Ellen will be seen walking to the left side of the screen.
- Interacting with the note in the Mother's Cell a second time will cause it to be wet with blood.
- A second bloody message will appear, telling you to try the shoes on.
- After trying the red shoes on and dying, the bloody hand print will be waving at you and the message will change, mocking you for wearing the shoes.
- The Father’s Cell can be entered after interacting with it once and then reading the bloody message and note next to it.
- In Version 1.07, this process has to be repeated a few times before trying the cell.
- After exploring the cell and attempting to leave, the door will be locked. Immediately, the chained skeleton will awaken and the wall will slowly try to close in on you and crush you to death. It is possible to escape by trying the door repeatedly.
- In Version 1.07, touching the closing wall will not kill Viola. Instead, the screen will go dark and Viola will then appear laying on one of the beds in the Yellow Flowers’ room.
- If the player successfully escapes the Father’s Cell, the skeleton will be seen slammed against the jail door as they depart.
- Washing the blood away from the shoes will kill the Tadpoles.
- After washing the shoes and approaching the entrance to the cellar, the chair will jitter (warning you of a possible danger in foresight).
- After retrievving the doll head, the Red grasses will be found hanging from the ceiling.
- If you approach them, one of them will fall to the floor and will still be wriggling.
- The Mother’s Cell will have bloody graffiti written over its door saying “Mother abandoned me.”
- The Father’s Cell will have bloody graffiti written over its door saying “Father didn't notice me.”
Poison Halls
- As you walk along the Poison Halls wearing glass shoes, a bloody Viola doppelgänger will fall into the poison river.
- After making it to the end of the halls, the poisonous river will become light purple and will be harmless.
- The writing on the sign near the entrance will also disappear.
- After retrieving the Headless Doll, a bunch of cockroaches will fall from the ceiling and roam all over the floor.
Dark Maze
- Searching the first corner of the maze and then leaving will cause blood stains to appear on the wall.
- After taking the wristwatch from under the table and opening the menu bar, the character’s mugshot will change to a red-skinned Viola with dark hair and clothing, shadowy eyes and donning a stretched out slasher smile. The item’s description will read “DIE.”
- Backtracking will cause a noose to drop down and hang Viola to death, dropping the bottle of glowing petals in the process.
- As you continue to walk down the maze, Ellen’s figure can be seen running ahead of you.
- One of the male bust statues will begin following you as you backtrack through the maze.
- One of the violet caskets’ lid will be open. In Version 1.07, they will both be open.
- After observing this event and backtracking, a bloody hand print will appear on the wall next to you.
- As you backtrack, three more bloody hand prints will splatter on the wall.
- The first batch of Male Bust Statues will all become headless. As you walk past them, a rolling sound will be heard.
- If you try to head back to the headless statues to inspect the noise, you will see one of the statues’ head blocking your path.
- Opening the menu bar after dropping the bottle of petals will cause the same bloody Viola mugshot to appear.
Yellow Flowers Room
- After speaking to the Yellow Flowers, a bloody message will be written on the wall saying “X the flowers and you’ll die too.”
- After picking up the skull from under the table, a blood stain will appear on the wall behind the beds.
- Touching the grandfather clock will cause it to fall over you while the text below is still loading.
- Walking into the Diary Chamber (1) will cause a hole to open up in the floor.
- Each Yellow Flower will gradually finish their cake.
- If you interact with the entrance to the maze after leaving it, the room will briefly become dark and empty and a Male Bust Statue (presumably the one that followed you) will appear behind you.
- The vase of roses will fall as you walk past it.
- After obtaining the Glass Shoes, the Yellow flowers will have then eaten all of their cakes.
- After retrieving the doll head, the Yellow flowers will be found torn to pieces while one of them will be munched on by the grandfather clock.
- Touching it will not kill you, but it will fall over once you have backed away from it.
- The three beds will be stained with blood as you lay down in each of them.
Medicine Room
- As you enter the Medicine Room, Ellen’s figure can be seen standing in front of the desired shelf.
- If you interact with the shelf after obtaining the Cute Little Bottle, the bloody message written on it will read “Medicine to kill me.”
- If you interact with the shelf containing eye drops on the upper far right corner, a pair of red eyes will briefly appear beyond the brick wall.
- The stump upon which the Black Cat stood in the Diary Chamber (2) will turn green and mossy.
- There will be fur left on the stump.